지난 글에서는 NFT가 거래된 블록 정보로부터 중복되지 않은 transactionHash를 얻고, 해당 transactionHash로부터 다시 블록 넘버와 거래된 KLAY의 양을 도출하였습니다. 이번 글에서는 추가적인 정보들을 얻는 방법에 대해 살펴보겠습니다. 우선 이번에도 Klaytnscope로부터 힌트를 얻고자 합니다.
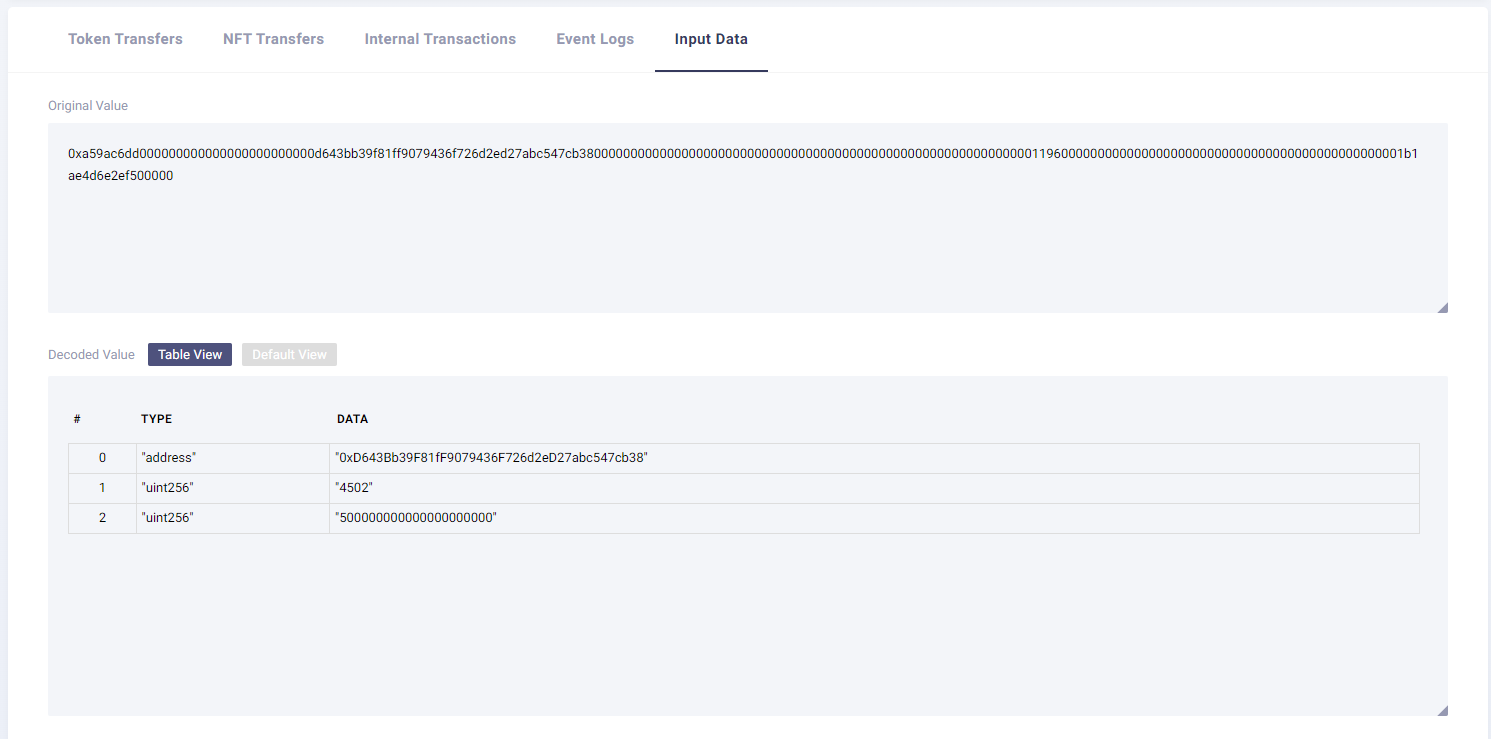
저희는 계속해서 'Puuvilla Society #4502' NFT가 500KLAY에 거래된 transcationHash에 대해 보고 있습니다. 해당 transcationHash에서 아래 목록들을 보면 기본값은 Token Transfers로 되어있는데, Input Data를 클릭해보니 다음과 같은 화면이 나왔습니다. Input Data의 Original Value는 transactionHash의 결과를 원본 그대로 출력했을 때 나오는 input 값과 동일합니다. 앞 글에서 caver.rpc.klay.getTransactionByHash() 함수로부터 결과를 출력한 부분을 살펴봐주시면 되겠습니다. Decoded Value는 3부분으로 나뉘는데, #1은 NFT 번호와 동일하고, #2는 KLAY와 유사한 것을 볼 수 있습니다. 남은 것은 address인데, 해당 값을 Klaytnscope에 검색해 보겠습니다.
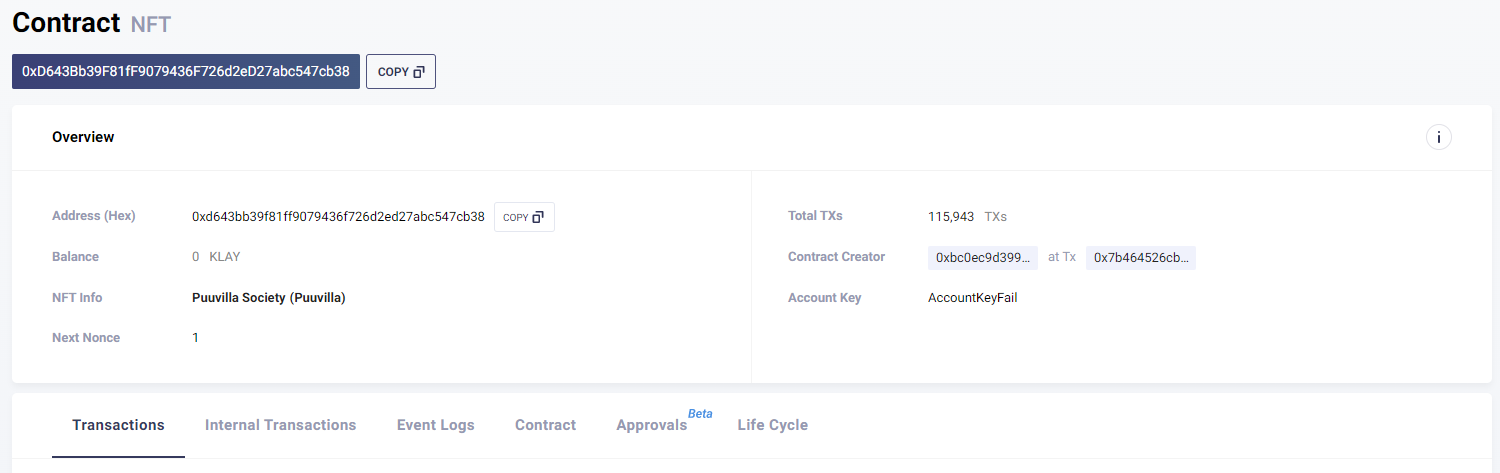
다음과 같이 저희가 살펴보던 Puuvilla Society NFT에 대한 정보가 나오게 됩니다. 이러한 과정이 코드로 구현될 것이기 때문에 알아두시면 좋습니다.
이제 input으로부터 NFT 정보들을 추출하는 과정을 살펴보겠습니다. Input Data 부분에 Decoded Value라고 되어있었으므로 caver-js docs에서 decode 관련 함수를 찾아보았고, caver.abi.decodeFunctionCall 함수가 input을 decode하는 것을 알 수 있었습니다. 해당 함수를 코드에 적용한 결과를 보면, Klaytnscope처럼 input을 3개의 구분된 정보로 출력한 것을 확인할 수 있습니다.
async function testFunction() {
  // Set Address
  const tokenAddress = "0x1f2d6282d74ef26eb6c7e28b9e7048c1b42ebda5"; // pKLAY contract

  // Get PalaSquare Transcation Information
  const pklayTxInfo = await caver.rpc.klay.getLogs({
    fromBlock: 109780733,
    toBlock: 109780733, //"latest"
    address: tokenAddress
  });

  // Get non-duplicate Transaction Hash
  const txHash = new Set();

  for (let i = 0; i < pklayTxInfo.length; i++) {
    txHash.add(pklayTxInfo[i].transactionHash);
  }

  const hash = Array.from(txHash);

  // Get NFT Information from Transaction Hash
  const tx = await caver.rpc.klay.getTransactionByHash(hash[0]);

  const result = caver.abi.decodeFunctionCall({
    name: 'buy',
    type: 'function',
    inputs: [{
      type: 'address',
      name: 'address'
    },{
      type: 'uint256',
      name: 'TokenID'
    },{
      type: 'uint256',
      name: 'amount'
    }]
  }, tx.input);

  console.log(result);

}

testFunction()
Result {
  '0': '0xD643Bb39F81fF9079436F726d2eD27abc547cb38',
  '1': '4502',
  '2': '500000000000000000000',
  __length__: 3,
  address: '0xD643Bb39F81fF9079436F726d2eD27abc547cb38',
  TokenID: '4502',
  amount: '500000000000000000000'
}
NFT의 address를 얻었으니 이제 저희가 알아볼 수 있는 정보로 출력하는 과정만 남았습니다. NFT에 대한 정보는 caver.klay.KIP17 함수를 사용하면 되며, name, symbol, tokenURI 등 다양한 정보를 출력할 수 있습니다. 저번 글에서 살펴봤던 hash로부터 블록 넘버를 추출하는 거나 KLAY의 단위를 변환하는 부분까지 포함하여 최종적인 코드를 작성해 보겠습니다. 결과를 살펴보면, NFT 프로젝트 이름부터 Token ID, 가격, 거래된 블록 넘버 및 시간까지 확인할 수 있습니다.
async function testFunction() {
  // Set Address
  const tokenAddress = "0x1f2d6282d74ef26eb6c7e28b9e7048c1b42ebda5"; // pKLAY contract

  // Get PalaSquare Transcation Information
  const pklayTxInfo = await caver.rpc.klay.getLogs({
    fromBlock: 109780733,
    toBlock: 109780733, //"latest"
    address: tokenAddress
  });

  // Get non-duplicate Transaction Hash
  const txHash = new Set();

  for (let i = 0; i < pklayTxInfo.length; i++) {
    txHash.add(pklayTxInfo[i].transactionHash);
  }

  const hash = Array.from(txHash);

  // Get NFT Information from Transaction Hash
  const tx = await caver.rpc.klay.getTransactionByHash(hash[0]);

  const result = caver.abi.decodeFunctionCall({
    name: 'buy',
    type: 'function',
    inputs: [{
      type: 'address',
      name: 'address'
    },{
      type: 'uint256',
      name: 'TokenID'
    },{
      type: 'uint256',
      name: 'amount'
    }]
  }, tx.input);

  // NFT
  const tmpNftInstance = new caver.klay.KIP17(result.address);
  const nftName = await tmpNftInstance.name();
  const nftURI = await tmpNftInstance.tokenURI(result.TokenID);

  // KLAY
  const amount = caver.utils.convertFromPeb(result.amount);

  // Date
  const blockNb = caver.utils.hexToNumber(tx.blockNumber);
  const tmpDate = await caver.klay.getBlock(blockNb);
  const date = new Date(caver.utils.hexToNumber(tmpDate.timestamp)*1000);

  console.log(`NFT Name: ${nftName}`);
  console.log(`TokenID: #${result.TokenID}`);
  console.log(`Price: ${amount} klay`);
  console.log(`TokenURI: ${nftURI}`);
  console.log(`Block Number: ${blockNb}`);
  console.log(`Timestamp: ${date}`);

}

testFunction()
NFT Name: Puuvilla Society
TokenID: #4502
Price: 500 klay
TokenURI: https://puu.by-syl.com/json/4502.json
Block Number: 109780733
Timestamp: Thu Dec 22 2022 14:28:54 GMT+0900 (대한민국 표준시)
이번 글에서는 transactionHash로부터 거래된 NFT에 대한 여러 정보를 출력하는 것을 확인하였습니다. 위의 코드에서 hash 부분을 array 형태로 쌓이게 만들었기 때문에, getLogs 함수의 fromBlock과 toBlock의 범위를 넓히고, result 부분을 반복문으로 감싼다면 거래된 정보를 계속해서 쌓을 수 있을 것입니다.
caver-js를 통해 PalaSquare에서 거래된 NFT 데이터를 수집하는 것은 여기까지 살펴보고, 이후에는 DB에 쌓고 Web에 표출하는 과정을 차근차근 설명하도록 하겠습니다. caver-js 관련해서 궁금하신 부분은 언제든지 댓글로 남겨주시길 바랍니다.
[이전 글]
1) [caver-js] caver-js 설치 및 KAS(Klaytn API Service) API 호출
2) [caver-js] PalaSquare NFT 거래 데이터 수집 (1)
3) [caver-js] PalaSquare NFT 거래 데이터 수집 (2)
'Blockchain > caver-js' 카테고리의 다른 글
| [caver-js] PalaSquare NFT 거래 데이터 수집 (2) (2) | 2022.12.27 |
|---|---|
| [caver-js] PalaSquare NFT 거래 데이터 수집 (1) (4) | 2022.12.22 |
| [caver-js] caver-js 설치 및 KAS(Klaytn API Service) API 호출 (2) | 2022.12.14 |


댓글